HOW TO STYLE YOUR RV HOME TO BE MORE HOMEY
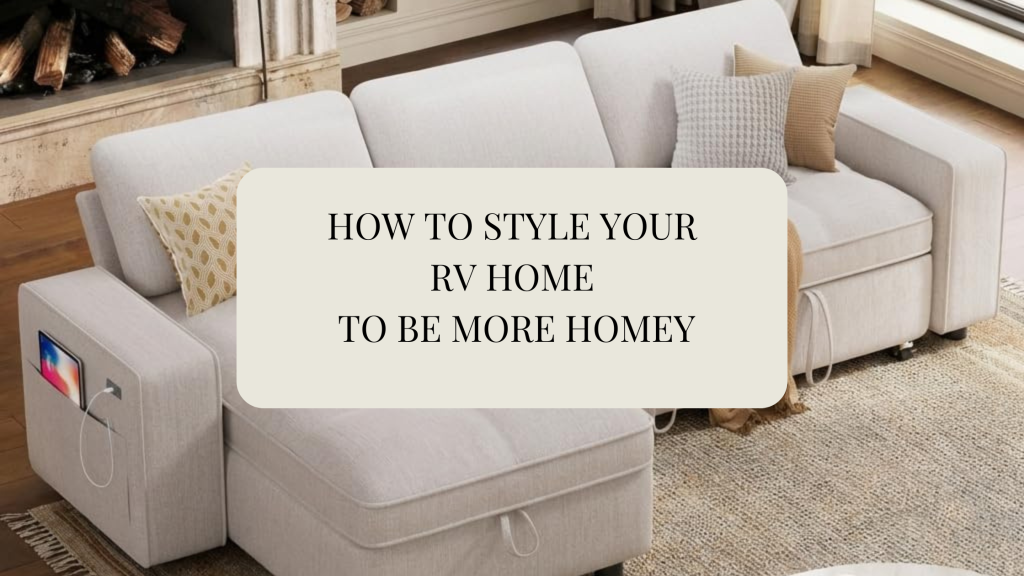
When I was young my family and I used to have a 40 foot Rv and we would travel around in it together. So many wonderful memories. Now that I have my own family we are adventuring out to the RV living world. Exploring and creating memories with my kids. So, stay tuned for when we buy our RV. Were I will make my RV Home to fit my lifestyle and taste. We have explored the RV shows and we do have our favorites. Even though they were very nice, they seemed to showroom / contractor grade look. They need a designer touch. Making it cozy, stylish and functional to your lifestyle. Rv’ing is either a vacation home or a permanent home. You should make it to your taste and style. Way’s in making your RV “Homey”. Soft Textures Layering texture instantly creates comfort. Add: linen-look curtains woven baskets knit throws textured pillows lightweight rugs soft bedding woven shades via: RV Showoff 2. Lighting Factory RV lighting is usually harsh blue-white LEDs. Switching lighting alone can completely change the mood. Do this: warm LEDs (2700K–3000K) dimmable lighting sconces battery puck lights under-cabinet lighting table lamps woven pendant lights (lightweight) Avoid: cool blue lighting overly bright ceiling-only lighting 3. Remove The RV colors Painting old or outdated cabinets with a coat of fresh paint could turn a room looking new. Older RVs especially have: yellow oak shiny espresso cabinets fake granite gray overload via: mountain modernlife 4. Wall Treatments Accessorizing your space will add interest and revealing a more put together look. You can show off your style. Easy upgrades: peel-and-stick wallpaper beadboard wood slats limewash-style paint framed art vintage signs mounted mirrors 4. Change window treatments Factory valances scream “RV.” Removing them modernizes the space immediately. Replace with: linen curtains Roman shades woven wood shades soft neutral drapery bamboo blinds via: rvinspiration 5. CREATE A REAL BEDROOM FEEL Many RV bedrooms feel temporary. Make it feel like a cozy bedroom. Add: layered bedding oversized pillows wall sconces upholstered headboard wallpaper accent wall warm bedside lighting matching bedding palette Biggest upgrade: Use real comforter styling instead of RV “bedspread sets.” 6. WALL TREATMENTS CHANGE EVERYTHING Walls are often what make RVs feel cheap. Easy upgrades: peel-and-stick wallpaper beadboard wood slats limewash-style paint framed art vintage signs mounted mirrors 7. ACCESSORIES The little details matter. Add: ceramic mugs cutting boards cookbooks faux olive branches candle warmers woven trays real-looking greenery antique brass hooks These create lived-in warmth. 8. UPGRADE THE DINETTE AREA Most RV dinettes feel stiff and cafeteria-like. Improve with: café-style seating removable table pedestal upholstered cushions wood tabletop pillows pendant light above table Think: tiny breakfast nook instead of RV booth. via:mountainmodernlife 9. FLOORING MATTERS A LOT One continuous floor throughout the RV makes it feel larger and more upscale. Best choices: warm oak LVP natural wood tones matte finish flooring wider planks Avoid: shiny gray floors busy patterns 10. MAKE THE KITCHEN FEEL CUSTOM RV kitchens often feel plastic-heavy. Easy upgrades: peel-and-stick backsplash matte black faucet brass hardware wood shelves under-cabinet lighting wood countertop covers decorative dish towels Fresh paint or stain cabinet inside accessories 11. MAKE IT FEEL CURATED — NOT CROWDED Small spaces get cluttered quickly. The trick is: fewer items better items Use: intentional décor matching containers hidden storage cohesive materials repeated textures/colors 12. BRING IN NATURAL ELEMENTS Nature softens RV interiors instantly. Great RV-friendly natural elements: faux olive trees eucalyptus stems rattan woven textures wood tones stone-look accessories linen fabrics 13. HIDE RV “UTILITY LOOKS” The more you disguise RV mechanics, the more residential it feels. Hide or soften: fuse panels vents plastic trim exposed wires bulky electronics Using: decorative baskets framed doors custom cabinetry panels hidden charging stations 14. CREATE ZONES Even tiny RVs feel better when visually divided. Zones: sleeping coffee area lounge dining workspace Use: rugs lighting color wall treatments furniture orientation to define spaces. 15. SCENT MATTERS MORE THAN PEOPLE THINK Smell affects perceived comfort massively. Best RV-friendly scent ideas: wax warmers simmer pots soy candles cedar sachets linen sprays 17. THE BIG SECRET What makes RVs feel truly homey is not expensive finishes. It’s: warmth softness lighting texture personality intentional styling comfort People remember how the RV felt emotionally: cozy peaceful inspiring welcoming That’s what separates a styled RV from just a remodeled RV. I’ve curated a few design boards/ shop the looks to help you design your RV Home. Get inspired. Get’s ideas. Find something you like? I’ve included a direct link for you to be able to shop easily. This blog may contain affiliate links. This is at no cost to you. I only recommend products I would buy for myself. Disclosures & Privacy Policy SOFA/ RUG/ PILLOW GREEN/ PILLOW FLORAL/ ARTWORK/ WOOD FLOOR/ SUBWAY TILE/ WALLPAPER SOFA/ PLANT/ RUG/PILLOW/FLORAL PILLOW/ OTTOMAN/ TILE/ GREEN SUBWAY/ WOOD FLOOR SOFA/ RUG/ PENDANT/ BLUE PILLOW/ FLORAL PILLOW/ WALLPAPER/ BLUE TILE/ WOOD FLOOR Are you looking to redesign your RV or Small home? Do you need some help? I would love to help. I can help you create a curated look for your entire home. Need suggestions on storage solutions? Let’s created solutions that help you get organized and stay organized. I’ve helped clients around the USA with my affordable Virtual Interior Design services. Check it out here! Follow me for more Design Tips and Inspiration. Before styling your home on wheels, Check out my previous blog post about – Tips & Guidelines when designing a RV Happy Styling!
SHOP THE LOOK: ENGLISH COTTAGE
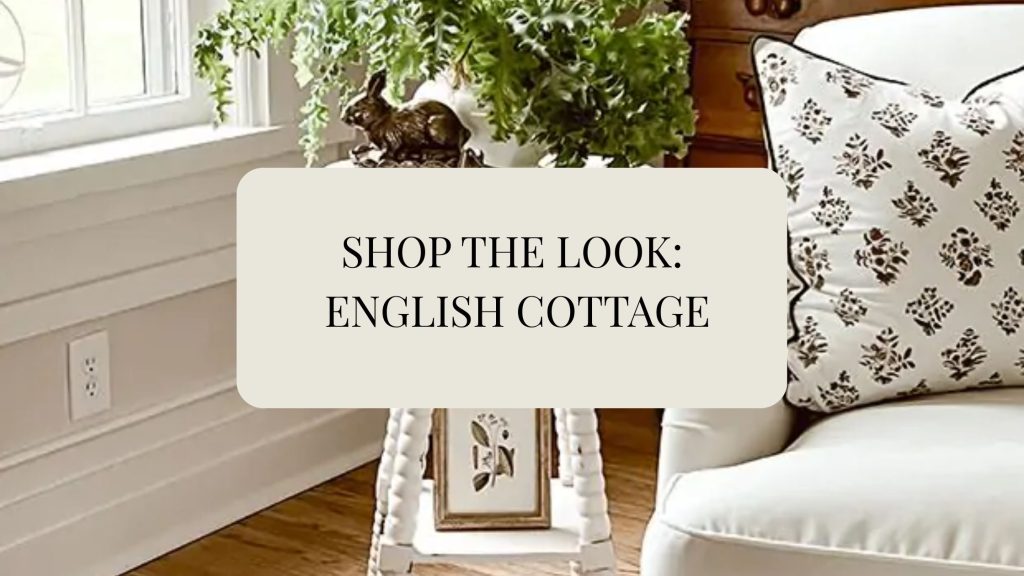
One design style that continually inspires me is English Cottage aka Cottage-core. I’m naturally drawn to spaces that feel organic, rustic, and deeply connected to nature. I love homes layered with vintage finds, historical touches, and natural materials that bring warmth and authenticity into a space. For me, design isn’t about trends—it’s about creating environments that feel grounded, storied, and timeless. Spaces that feel collected over time, filled with character, history, and quiet beauty. 1. What Is English Cottage/ cottage -core? English Cottage is a romanticized aesthetic inspired by: Rural European countryside life Handmade living Slow, intentional rhythms Gardening, baking, sewing, homemaking Vintage charm It’s about simplicity, nostalgia, and natural beauty. 2. Core Design Elements Color Palette Warm cream Soft sage green Dusty rose Muted lavender Butter yellow Faded blue Warm wood tones Materials Natural wood (unfinished or lightly stained) Linen & cotton Wicker & rattan Stoneware & pottery Lace & crochet Dried flowers Textures Floral prints Gingham Ruffles Quilts Distressed finishes To help you visualize the possibilities, I’ve created two curated “Shop the Look” living room designs that you can easily recreate in your own space. click the links to shop SOFA/ ARTWORK/TABLE/ HUTCH/PENDANT/TRUNK/CHAIR/TABLE/RUG/GREENPILLOW/ RABBIT PILLOW/ FLORAL PILLOW/ WHITE PILLOW click the links to shop SOFA / CHAIR / RUG / PENDANT / KNITTED PILLOW / BLUE PILLOW / TABLE / WINDOW PANELS ( This Affiliate links are included for your shopping convenience. I might get a small commission. No cost to you) Privacy & Disclosure Love this style?Sign up for my newsletter and receive weekly inspiration from Jade & Sage. Each week I share Shop the Look designs, step-by-step design guides, and ideas to help you create a home that feels timeless and beautifully curated. When you join, I’ll also send you my FREE e-book: The Designer Room Formula Blueprint, revealing the simple design framework professionals use to create balanced, designer-level rooms.
DESIGN TIP: ART HANGING

Design rule to follow while hanging artwork and mirrors. I’ve seen plenty of times when entering a room that their art is hung way to high. Also, the art piece are to small for the area. I’ve created a quick diagrams of how high to hang art over sofas, beds and mantles. Rule 1- Hang art 57-60″ from floor to center of art/ mirror. You typically want your piece to be at eye level. A standard eye level is approximately at 60″. Rule 2- The size matters in selecting a piece of art. When choosing art above a bed or sofa your artwork or mirror should be 2/3 the size of furniture piece. An example: A 96″ sofa, the ideal art size should be approximately 60 to 75 inches wide, which is about 2/3 of the sofa’s width. Rule 3- If you are using an art collection or creating a gallery wall. Make each art piece spaced out evenly. Minimal distances between art to art is 3- 6 inches apart. Tip: Use tape or paper templates to visualize spacing before committing to hanging the art. This allows for adjustments based on personal preference and the specific area. Well there you have it. How to hang art. With a few easy steps you can hang art successfully. Looking for beautiful unique art pieces check out this wonderful art company with very talented artist. Awesome Art Finds Need help finding the right piece? Need a visual? I can layout a drawing with the exact size, and install guide and art piece to purchase for your space. Contact me! Check out my design service done “Virtually”. DESIGN ADVICE
Key Aesthetics for a Zen Bedroom
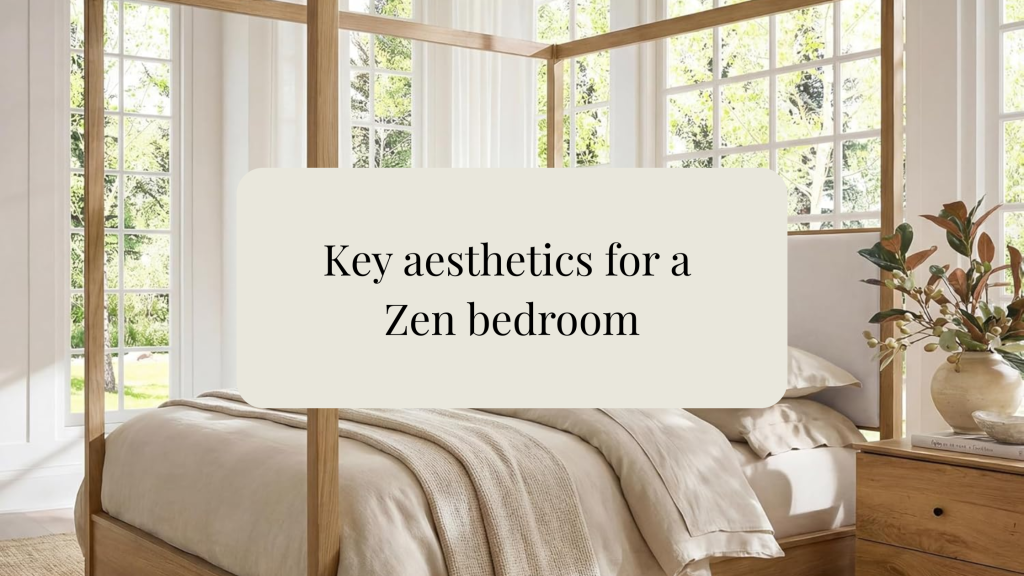
One room I feel we often overlook is the bedroom, but it is one of the most important spaces in the home. It is where we rest, recharge, and spend a large portion of our time. Because of that, your bedroom should feel calm, peaceful, and comforting. A cluttered space can make it harder to truly relax, but when your bedroom is clean, organized, and thoughtfully designed, it creates a sense of peace the moment you walk in. Soft colors, cozy textures, simple décor, and a clutter-free layout can all help create that Zen appeal — turning your bedroom into a restful retreat you actually look forward to spending time in. “Your bedroom should not just be where you sleep — it should be where you breathe, reset, and feel at peace.” BED/CHAIR/DRESSER/RUG/WALLPAPER/NIGHTSTAND/ARTWORK/BEDSHEETS/JADE PLANT/STORAGE BOXES/ PILLOW/ GREEN PILLOW/ BLUE PILLOW For a bedroom to feel calm, peaceful, and Zen, the overall design should feel simple, soft, natural, and uncluttered. The goal is to create a space that helps your body relax the moment you walk in. Key aesthetics for a Zen bedroom: 1. Soft neutral colorsUse warm whites, beige, taupe, soft gray, muted greens, clay, or light wood tones. Avoid harsh bright colors that feel too energetic. 2. Natural materialsBring in wood, linen, cotton, rattan, bamboo, stone, clay, and woven textures. These make the room feel grounded and organic. 3. Minimal clutterA Zen bedroom should feel open and breathable. Keep nightstands simple, hide cords, use closed storage, and only display items that feel calming or meaningful. 4. Soft layered beddingUse breathable bedding with a relaxed look: linen duvet, cotton sheets, soft throw blanket, and a few simple pillows. Think cozy, not overdone. 5. Gentle lightingAvoid harsh overhead lighting. Use warm lamps, sconces, candles, or dimmable lighting to create a soft evening glow. 6. Balanced furniture layoutKeep the room easy to move through. A centered bed, matching or balanced nightstands, and clear walkways help the room feel calm and intentional. 7. Nature-inspired decorAdd plants, simple branches, landscape art, pottery, or a small water-inspired element. Nature helps create that peaceful retreat feeling. 8. Quiet textures instead of busy patternsUse texture for interest rather than loud prints. Think woven baskets, linen curtains, boucle, wood grain, or a soft area rug. “A Zen bedroom is all about creating a peaceful retreat through soft neutral colors, natural materials, gentle lighting, and minimal clutter. The design should feel calm, balanced, and intentional, allowing the space to feel restful, grounded, and inviting.” BED/CHAIR/DRESSER/RUG/WINDOW TREATMENT /BEDSHEETS/JADE PLANT/STORAGE BOWL/ PILLOW/ BLUE PILLOW This blog contains affiliate links. there is no cost to you. I might receive a small commission if you like something you see and purchase it. Note: I only share products that I would as a designer use for myself and select for my client. Your considering redoing your bedroom? Your confused on how to design the room and how to style it to complete that look you’ve been eyeing for so long? I would love to help. I offer a wonderful and easy service called E-Design. CLICK HERE to find out more. Have questions about my E-Design (Virtual Design) service? Message me. Click here
Amazing Rug! Designer Round Up
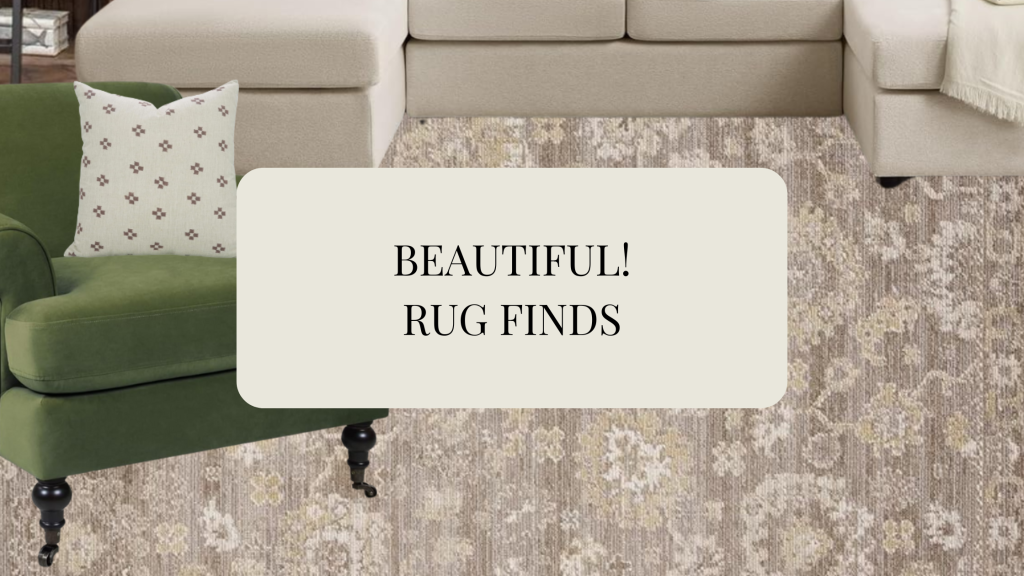
Welcome to Jade & Sage Finds — a curated roundup of beautiful pieces and inspiring discoveries I’ve come across this week. As a designer, I’m always searching for timeless home décor, stylish accents, furniture, area rugs, throw pillows, books, and other pieces that can bring warmth, character, and beauty into a home. When I find something lovely, practical, or inspiring, I love sharing it with you. This week, I came across a beautiful selection of area rugs, and I have to say — these finds are truly lovely. Whether you’re looking to add texture, warmth, pattern, or a cozy finishing touch to your space, these rugs are worth taking a look at. Here’s this week’s roundup! This blog contains affiliate links. I might get a space commission There is no cost to you. Disclosures & Privacy Policy Area rugs are one of the easiest ways to transform a space—but only if they’re placed correctly. The right rug can anchor your furniture, define zones, and bring warmth and balance to your home. Here are simple, designer-approved tips to get it right every time If your looking for an area rug for your room, but unsure what to select or what size, I wrote on that topic. How to pick the right size rug. Hillcrest Area Rug Stithians Area Rug Southwark Area Rug Rachel Area Rug Like what you see and want to more designer finds? Fill out the form below for my newsletter. I share weekly. I help busy families with their interiors around the USA. Check out my E-Design Services. What is E-Design and how it can work for you. A fun and time saving way in working with an Interior Designer.
Fall Home Décor

It’s getting cooler out, well not here in Florida, but when living in New Jersey I remember the coolness in the air by now. I don’t miss the cold though. lol I do love the colors in the leaves changing and apple picking. The fall smells are amazing for instance in the spiciness and earthiness of fall candles and the flavors in the delights like of pumpkin spice, and apple pie. I really enjoy changing up my décor for the seasons. Don’t you? I’m always looking for unique décor items for my clients. Here are a few fall décor items that are I believe a must have for your home. My go to stores you have got to check out. These stores are amazing and affordable décor options with you in mind. I absolutely love their products. Come take a look! Love the Farmhouse style? Antique Farm House and Décor Steals specializes in that style. Antique Farm House Decor Steals (This blog contains affiliate links. Which may give me a small commission of any purchases. There is no extra cost to you. This helps me to keep this blog going. Which I love.) word Art Acorn bowls 2a.Lid Jars Hello Fall Art Table Runner Autumn wreath Cozy Blanket Pumpkins Floral Mug set Autumn leaves pillow Candle sticks Pillow The simplest way to change out from season to season is by considering switching out your pillows, throw blanket and table setting. That will miraculously create a different look and you’ll be ready for fall. If wanting to take a step further, change out also your window treatments with earthy and richer color tones in a heavier fabric and match it with a coordinating color area rug to finish up the look. This for sure will give you a more dramatic feeling from summer décor into fall décor. Which ever way you decide, you can’t go wrong. Have fun with it and enjoy the fall season because it seem it leaves us so fast and then here comes Christmas. I do looove Christmas! Oh boy! lol! Time flies I swear! Stay tuned for the Christmas decorating. Happy Decorating! Working on a design project? Need some help? I would love to help. Let’s collaborate on your next project. I offer an amazing and time saving service called E-Design. Want to know more? Check it out! What is E-Design! Click Here
How To’s/ Tips on how to style a Shelf

Styling shelving can feel a little overwhelming at first. You may have beautiful pieces you love, but when it comes time to place them on your shelves, it can be hard to know where to begin. The good news is that shelf styling does not have to be complicated. With the right balance of decor, books, baskets, greenery, and personal touches, you can create shelves that feel collected, intentional, and beautifully designed. Whether you are styling built-ins, open kitchen shelves, a bookcase, or a small accent shelf, the key is to create a look that feels both functional and pretty. In this post, I’m sharing simple design tips to help you style your shelving with confidence and create a space that feels warm, balanced, and pulled together. Here are some simple design tips for styling shelving that make shelves look curated instead of cluttered: Start with a clean slate Take everything off first. It is much easier to style shelves when you can rebuild the look from scratch instead of moving pieces around endlessly. Mix heights and shapes Use a variety of items: tall vases, stacked books, small bowls, framed art, baskets, candles, pottery, and greenery. This keeps the shelves from looking flat. Use the “triangle” trick Place items at different heights so your eye naturally moves around. For example, use a tall vase on one side, a medium frame nearby, and a small decorative object lower down. Layer pieces Lean a framed print or small piece of art against the back of the shelf, then place smaller objects in front of it. Layering gives the shelf depth and a designer look. Add books both ways Stack some books vertically and some horizontally. Horizontal stacks are great for placing a candle, bowl, or small object on top. Leave breathing room Do not fill every inch. Empty space is part of the design. Shelves look more expensive and intentional when they are not overcrowded. Repeat colors and textures Choose a simple color palette and repeat it throughout the shelves. For example: warm wood, cream, black accents, brass, greenery, and woven texture. Add something natural Greenery, branches, wood, stone, baskets, or ceramic pieces help soften the shelf and make it feel warm and lived-in. Use baskets for hidden storage Baskets are perfect for lower shelves. They add texture while hiding things like cords, remotes, papers, toys, or extra candles. Step back and edit After styling, step back and look at the shelves from across the room. Remove anything that feels too busy. Usually, taking one or two pieces away makes it look better. Simple formula:Books + vase + framed art + greenery + basket + one personal item = beautifully styled shelves. Needing some help creating a cohesive look? Let’s collaborate . I would be happy to help you with the look that you are trying to achieve and provide you with the resources to complete your look. Check out my other How to style series How to style a night stand How to style with throw pillows How to design like a pro Don’t want to miss out? Join my newsletter to stay in the loop!
How to style with Throw Pillows | Designer Finds
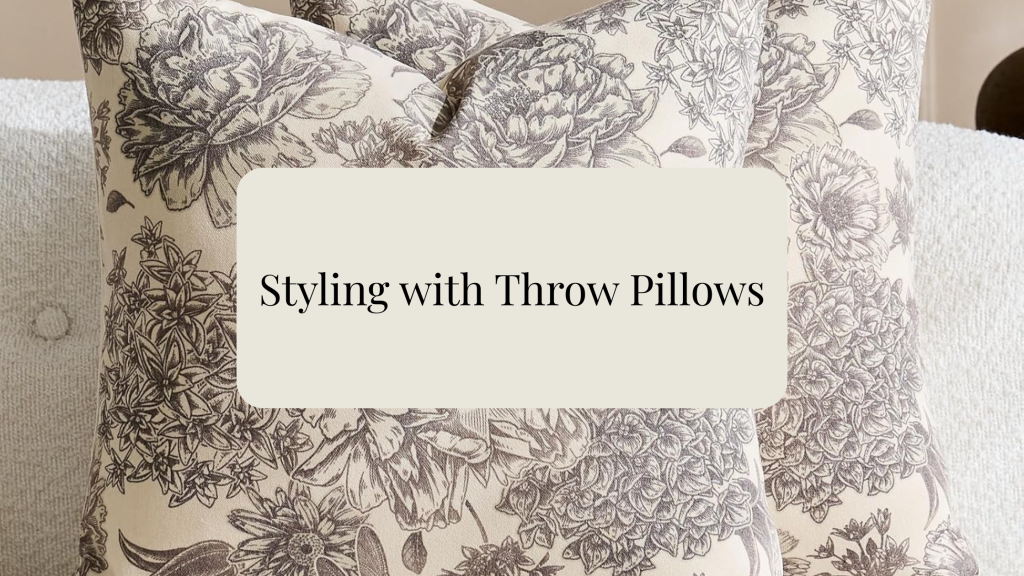
Hey everyone! One of my favorite décor items to shop for is throw pillows. They are such a simple yet beautiful way to refresh a space. Pillows can bring in pops of color, gorgeous textures, pattern, and visual interest, helping a room feel more styled and complete. Want a quick redesign without changing your furniture? Simply swap out your pillows. You can create a whole new look from season to season by changing the colors, fabrics, and patterns. Design Tip: Keep your larger furniture pieces, such as your sofa, in a neutral palette. This makes it much easier to change out your decorative accents over time and refresh your space without having to start from scratch. Selecting your pillows Steps Step-by-Step Guide to Designing with Throw Pillows Throw pillows are one of the easiest ways to make a room feel finished, styled, and cozy. They add color, texture, comfort, and personality without having to redesign the whole space. Step 1: Start with the Room’s Color Palette Before choosing pillows, look at the colors already in the room. Pull colors from: Area rug Artwork Curtains Accent chairs Wood tones Wall color Décor pieces A good rule is to choose 2–3 main pillow colors that connect back to the room. This keeps everything looking intentional instead of random. Example:If your room has beige walls, a navy rug, and warm wood furniture, you could use pillows in cream, navy, rust, and soft tan. Step 2: Mix Pillow Sizes Using all the same size can look flat. Layering different sizes gives the sofa, bed, or chair more depth. For a sofa, try: 22×22 pillows in the back 20×20 pillows in the middle One lumbar pillow in front For a bed, try: Larger pillows in the back Medium decorative pillows in front One long lumbar pillow across the front This creates a designer-style layered look. Step 3: Mix Patterns Carefully Patterns make pillows interesting, but too many can feel busy. A simple formula: One large pattern + one small pattern + one solid Example: Large floral pillow Small stripe pillow Solid velvet or linen pillow You can also mix: Stripes Florals Plaid Geometric prints Vintage-inspired patterns The key is making sure they share similar colors. Step 4: Add Texture Texture is what makes pillows feel cozy and high-end. Try mixing materials like: Linen Velvet Bouclé Cotton Woven fabric Faux leather Knitted textures Fringe or tassels Even if you stay neutral, texture keeps the design from looking boring. Example:Cream linen + beige boucle + tan leather + woven stripe looks calm but still interesting. Step 5: Use Odd Numbers for a Relaxed Look Odd numbers usually feel more natural and less stiff. For a sofa: Small loveseat: 3 pillows Standard sofa: 5 pillows Large sectional: 7 or more pillows For a more formal look, use even numbers and keep both sides balanced. Step 6: Think About Shape Not every pillow has to be square. Use a mix of: Square pillows Lumbar pillows Round pillows Bolster pillows A lumbar pillow is especially helpful because it breaks up all the square shapes and makes the design feel more custom. Step 7: Balance Both Sides Your pillows do not have to match exactly, but they should feel balanced. For example, one side of the sofa could have: Large solid pillow Patterned pillow Small lumbar The other side could have: Large textured pillow Coordinating pattern pillow They are different, but the colors and sizes still work together. Step 8: Don’t Overcrowd the Furniture Pillows should make the space comfortable, not make people feel like they have nowhere to sit. A good test:Can someone sit down without removing every pillow? If not, there may be too many. Step 9: Choose the Right Inserts This is one of the biggest designer tricks. Use pillow inserts that are 1–2 inches larger than the pillow cover. Example: 20×20 cover → use a 22×22 insert 22×22 cover → use a 24×24 insert This makes the pillows look fuller and more luxurious. Step 10: Style Them Naturally You can do the classic “karate chop” in the center of larger pillows, but don’t overdo it. Let the pillows look soft, comfortable, and lived-in. For a cozy home look, slightly angle the pillows instead of lining them up perfectly straight. Easy Designer Pillow Formula For a sofa: 2 large solid pillows + 2 patterned pillows + 1 lumbar pillow For a bed: 2 large pillows + 2 medium pillows + 1 long lumbar pillow For an accent chair: 1 beautiful pillow or 1 lumbar pillow Final Design Tip Throw pillows should feel like they belong in the room, not like they were added at the last second. Repeat colors, mix textures, vary sizes, and keep the overall feeling comfortable and practical. That is what gives a space that styled, designer-finished look. Designer Finds I’ve selected some amazing pillows for you to check out! Click on images below. Many awesome pillows to choose from. Some of these are pillow covers and others are not. |These links are affiliate links. There is no cost to you. If you make a purchase I might get a small commission. This helps me to keep my blog going. Disclosures & Privacy Policy| When designing your space with pillows what size do you choose for a sofa and a bed? How many do you get? I’ve created a guide you can follow. Looking to redesign your home? Needing some guidance on how to pull it all together? I would love to help. Let’s chat about your next project. Check out how my E-Design Services can help you. Click here These other blogs might be of interest to you. Check it out! 6 Steps How to design your home Design Tip: Area Rug Arrangement Design Tip: Window Treatment Design Tip: Art Hanging Want to stay in touch? Join my Newsletter! I share each week design tips, inspirations and decor finds etc.
Clever Storage Solutions For Your Home
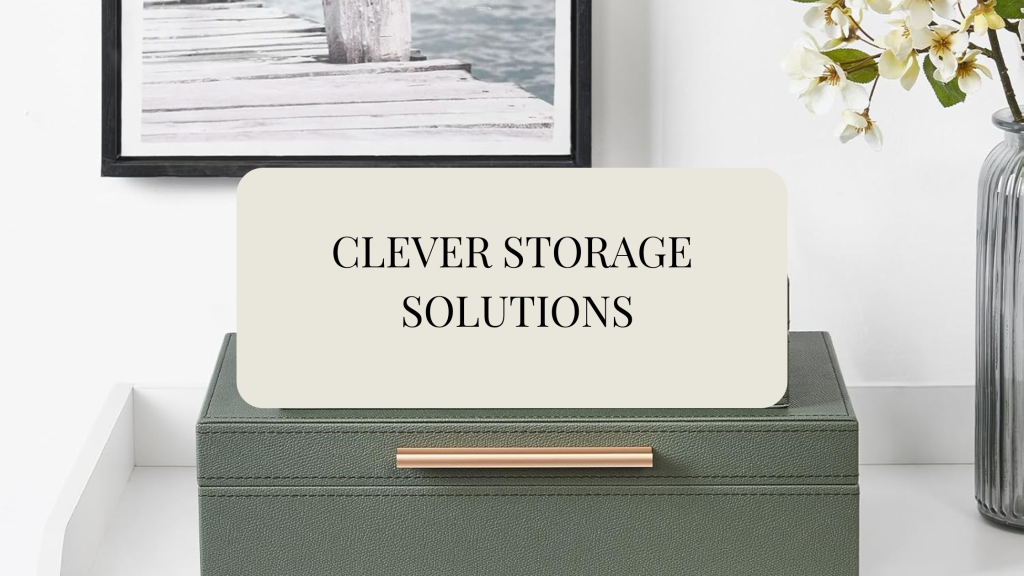
The warmer months are here, and it’s the perfect time to get outside, refresh our spaces, and finally tackle those home projects we’ve been putting off. Lately, I’ve been focusing on getting our home more organized — cleaning out closets, sorting through drawers, and letting go of the things we no longer want, need, or use. There’s something so refreshing about decluttering and creating space for the things that truly matter. As I’ve been working through our home, I came across some beautiful and practical design solutions that make organizing feel a little more stylish. Think artisan baskets for extra throws and pillows, decorative trays and boxes for drop-off zones in the entryway, and simple storage pieces for dressers and nightstands — perfect spots for keys, wallets, jewelry, and everyday essentials. I found some amazing pieces that can help make your home feel more organized, beautiful, and intentional — and I can’t wait to share them with you! My Storage Finds Shopping links for your convenience. This blog may contain affiliate links. There is no cost to you. This helps me to keep my blog going. Disclosures & Privacy Policy 1. SPICE HOLDERS W/LABELS 2.SPICE PULLOUT 3. GREEN BOXES 4. Earthtone Bowl 5. WIRE STORAGE BASKETS 6. VINTAGE GLASS JARS 7. BASKET BINS 8. WICKER BASKET 9. ORGANIZE BINS 1. Spice Holders w/ LabelsUse matching spice jars with clean labels to make your kitchen feel organized and intentional. They keep everyday seasonings easy to find while giving your pantry or countertop a stylish, uniform look. 2. Spice PulloutA spice pullout is perfect for saving cabinet space and keeping small jars from getting lost. It makes cooking easier because everything is visible, organized, and within reach. 3. Green BoxesDecorative storage boxes are great for hiding clutter in plain sight. Use them on shelves, consoles, or desks to store paperwork, cords, keepsakes, or small household items while adding a soft pop of color. 4. Earthtone BowlA simple earthtone bowl is both decorative and functional. Place it on an entry table, kitchen island, or coffee table to hold keys, fruit, decorative beads, or everyday drop-zone items. 5. Wire Storage BasketsWire baskets are great because you can see what’s inside while still keeping things contained. Use them for produce, pantry items, towels, or cleaning supplies for a practical farmhouse-style touch. 6. Vintage Glass JarsGlass jars are perfect for storing dry goods like oats, pasta, cookies, coffee pods, or craft supplies. They keep items fresh-looking, easy to see, and add a vintage collected feel to your home. 7. Basket BinsBasket bins are a stylish way to organize pantry shelves, linen closets, bathrooms, or laundry rooms. Labels make them even better because everything has a home and the space stays easy to maintain. 8. Wicker BasketA large wicker basket adds warmth and texture while hiding bulkier items. Use it for throw blankets, pillows, toys, laundry, or extra linens to make storage feel cozy instead of cluttered. 9. Organize BinsClear organizer bins work beautifully for laundry rooms, bathrooms, and utility spaces. They keep products grouped together, make supplies easy to grab, and give everyday essentials a clean, elevated look. Happy Organizing! I love sharing what I find with you. I will continue to share with you items that I must have that you might want also in your own home. Like what you see? Want to see more that I have to offer? Check out some of my other blog post. Like what you see? Not ready now? Pin it for later! Have a design project and want to work with me? I would love to help. Let’s Collaborate on your next project. Contact me. Get your Home De-cluttering Ebook + Bonus pages. Click Image Below
How to create a color palette for your home

Have you ever found yourself scrolling through Pinterest or Instagram, saving all those beautiful interiors you’re absolutely loving? You notice how every space looks so pulled together, layered, and intentional — and you think, “Wow, I wish my home could look like that.” Well, the good news is… it can. Creating a designer-inspired home is all about building a cohesive look that flows naturally from room to room. It’s not just about making one space, like your living room, look beautiful. The goal is to create a home that feels connected, balanced, and thoughtfully designed throughout. When your colors, textures, furniture styles, and décor choices work together, your entire home begins to feel more polished and complete — almost like you had a designer come in and pull it all together for you. Here are a few simple tips to help you create a more cohesive look throughout your home. Where do you find your color palette Create a color palette. You can get your color palette from: Your favorite color From inspirational pictures. Artwork or area rugs anything that you just need to have in your life structural elements that can’t move Example: kitchen cabinets, flooring and counter tops 1.Favorite colors Do you have a favorite color? Is it a color that would look great in the home? Your favorite color can be spread throughout your home. That would be your great POP of color. For Instance, my favorite color is Blue. I would use that color as my main pop color/ accents. I would add blue in the accent pillow, in the rug and accent pieces. 2.Overall feeling from Inspirational pictures Grab a few pictures from Pinterest and Instagram and create a board. Select anything that catches your eye. Take a look do you see the types of colors and styles you are drawn to? Inspiration pictures can help guide you with your color palette and how your overall style will be. 3. Artwork and Area Rugs Artwork and an area rugs are great ways in coming up with your color palette. Loving an art piece that is in your home or it might be in a store that you have been eyeing all this time? Take a look in the colors being used. Select 1-2 colors out of that piece. You don’t have to use all the colors in the piece just select a few. How to create your color palette 1. Select a neutral select 1 or 2 neutral colors. Neutrals for instance like gray, taupe, tan, brown, cream and black 2. Select a white The white or off white will help coordinate with the neutral colors. The white could be used on the trim, ceiling and doors. 3. Select your pop of color then add 1 shade lighter This is your overall color that will be seen throughout your home. How to use your color palette 1. Main color The neutral will be your main color and overall wall color. Use that main color in different ways throughout your home. This helps coordinates with the neutral. The white could be used on the trim, ceiling and doors. I suggest starting with a neutral sofa. For one main reason if you chose just say a “red sofa” because you liked how it looked at the time or you were following a trend. Then you started not liking this sofa? Will you replace it? If you don’t mind spending money then this would be fine. I suggest investing in a good neutral sofa. You want quality and durability. It’s more affordable to replace throw pillows, artwork and area rugs then keep replacing a sofa. Also, choosing a neutral sofa is easier to coordinate the colors throughout the home. Down the road you have decided that you wanted a change. You already have a neutral canvas already to work with from your neutral sofa and walls. 2. Pop of color The color would be seen on accent walls on pillows and accent chairs. The shade lighter will give you depth . Tip: Colors should be repeated 3 times in the room to help create the cohesive look. 3. Select an accent color The accent color would be the main pop colors complementary color and/or shade lighter of that color. This color will compliment the main color. Inspiration Photo Let’s look at an example. What’s the color palette in this picture? The neutral is white, and black. The pop of color is blue and green and the accent is gold. You will then use these colors throughout your home. Needing help with your home, let’s talk about your project! I collaborate with clients in the throughout the USA all online. By taking your inspiration, I put together a cohesive design for your space that is tailored to you personal design style. I do all of this within your budget. LET’S COLLABORATE Color palette inspiration boards